Daily Log
Friday July 24th
I finished hooking up the HCL's He and water supply. I pumped it down, it did seem to leek a bit more then normal, I'll tighten up the He inlet connection to see if this fixes it. I slowly opened up the valve from the intermediate chamber to the HCL until it stabilized at 2mTorr. I then put 1Torr of He into the HCL and watched the pressure inside the intermediate chamber. I saw no noticeable change in the pressure in the intermediate chamber while doing this. This seems like a good way to get the purest He and keeping our chamber at a low pressure. I will have to try this with the large chamber pumped down and observe the change in pressure there, where we really care what the pressure is. I also turned on the water supply, and quickly turned it off when water started spraying. I fixed the two leeks in the water line. I gave it another try and it didn't leek at all. So everything is set up, the HCL is now ready to turn on.Thursday July 23th
Today I started doing things that needed to get done for the HCL turn on. I started setting up the water cooling to make sure we had all the right hoses and connections. Sadly the way that would be easiest to set up is the incorrect way of doing it. So I had to use adapters and connectors of different types to get from the connection from what we had to the connections that we needed, with the equipment we had. I got it in the end. I also placed the photo diode in the chamber again and hooked it up once again.Wednesday July 22th
I added the other pressure gauge back to the intermediate chamber. I also starting figuring what exactly I need to do to turn the HCL on. I'm aiming for sometime next week to do the turn on. I tried to put on the window back to the HCL, but then I noticed that we had a nasty leak. I removed the window and saw that the window had broke. I cleaned the photo diode using the ultrasonic cleaner. I gave the plastic plate to Norm to modify and I'll reinstall it tomorrow.Tuesday July 21rd
The pressure equalized to 9mTorr, which is odd, normally it goes down as time goes on, but it went up slightly. I also helped Lewis and Pat troubleshoot MOSES. After testing connections and that the signals were being sent, we tried the power button again and found that it turned on this time. Bo got me back the photo diode, which was on a new circuit board, I'm going to modify the plastic plate it is on tomorrow.Monday July 20nd
The HCL pressure was at 8mTorr when I came to the lab today. I'm going to let it run over night again and see if there is any change. My afternoon was spent with the MOSES turn on meeting, which failed to turn on for some reason. I'm going to do some slight helping tomorrow to figure it out.Friday July 17th
Today when I cam into the lab the system had equalized to about 30mTorr. So then I tried to hunt down the new leak that is in the system someplace. I redid the pipe fitting connections again, and took apart and put back together the HCL. I also cleaned the O-rings on the KF flanges in the system. Going to try the test on Monday and see where it gets me.Thursday July 16th
I came into the lab today and it had stabilized to 56mTorr. I am unsure of the cause of the sudden rise in stabilization pressure. I do recall pumping the t-fitting that is on top of the HCL and this caused it to rotate and possibly mess up the seal in the pipe fittings. This could also be from a o-ring that didn't seal right or something completely different. I redid the Teflon on the pipe fittings and am going to try to find the equalization pressure again. Also I went to look at the photo diode inside the large chamber, to check electrical connections and found fingerprint on it. When I took it off to take a better look at the prints, I found that one of the two pins that hold the photo diode in place broke off. We are going to try and fix it, and hopefully get it working.Wednesday July 15th
I came in this morning and it was at 8mTorr. I took a piece of the HCL that connects the intermediate chamber to the HCL down to the machine shop and had some screw holes drilled all the way through in an attempt to fix possible virtual leaks. Pumping it down and see what it is in the morning.Tuesday July 14th
When I came into the lab today the pressure was at 10mTorr. I worked on my main webpage a bit today, I'm not very artisitc so it took awhile and is basic. I am going to let the HCL continue the test and see if it gets lower.Monday July 13th
I opened up the HCL and took out 5 of the 6 screws that hold a metal disk over the pinhole to see if these were the cause of the virtual leak. I pumped it down and am going to run the test overnight to see what it stabilizes to. When I left it was at 14 mTorr after about 3 hours of running.Friday July 10th
When I left Thursday afternoon the pressure was at 36mTorr. This morning when I got to the lab the pressure was at 32 mTorr. I then spent the morning trying to figure out where virtual leaks may be. The plate that holds the pinhole in has two O-rings that could form an air pocket. I removed one of them pumped it down and ran the test for the rest of the day. By the end of the day the pressure was at 27mTorr in about three hours.Thursday July 9th
Today I started the test again, but this time I am going to leave it overnight to see what pressure it multimeter gets too. In the mean time I am trying to find a good measure of the intensity of the Ne II line. But it seems that every paper goes back the the Persons paper I talked about before.Wednesday July 8th
I started once again by getting the leak checker going. It showed no leak by the bolt I put Torr Seal to. But it showed some leakage in the pipe fitting that goes into the HCL, it didn't seem to be coming from the fitting itself but the sealant that was attaching the fitting to the HCL. So I applied a good amount of Torr Seal on top of the old sealant and tried to form a new seal independent of the old one. I let that sit over lunch and then tested with the leak checker and found nothing anywhere. So I ran ran the test and found that sadly it is still leaking. (sigh) It got to 17mTorr in 75mins.Tuesday July 7th
I started out the day by replacing the pipe fitting to NW-40 flange on top of the HCL. Used the leak checker again and found that it wasn't leaking. I then found that the plastic plate to HCL chamber connection was leaking at around the 2 o'clock position. So I took it apart and cleaned the o-ring, I would of liked to replace it, but I couldn't find one. Tried the leak checker again and it was still leaking in the same area. Quite by accident I moved the He over the bolt on top and a little to the right of the HCL and the leak detector went off. I played around with it a bit and found that it seemed to be the source of the leak. I couldn't removed it to check it due to the fact it had some kind of clear adhesive, so I just applied Torr Seal to the outside of it. I'll let that set overnight and see if it had any affect in the morning.Thursday July 2nd
Dr. Neumeier showed me how to use the leak detector today. It is fairly simple to use and much quicker way of finding the leaks. So I went around the HCL and leaked He around it and the leak detector makes a noise when it detects He coming into it. I found a few leaks, One KF-flange was leaking, tightened it up a bit and it quit. There is also a leak on the intermediate chamber flange, going towards the valve. Also all of the large O-rings in the HCL seemed to have small leaks. But by far the biggest was in the pipe fittings on top of the HCL. Another interesting thing is that the Televac gauge and the valve didn't leak at all, at least not in the same order of magnitude as the other leaks.Armed with this knowledge I took apart the HCL and examined all of the o-rings and redid the pipe fittings. Put it all back together and ran the leak detector again and I fixed two of the leaks from the o-rings. But one seemed to get a little worse the HCL chamber to pinhole chamber connection. And I was able to fix the bottom pipe fitting, but the top one still leaks.
Wednesday July 1st
I set off to try and fix the detector or at least figure out what was wrong with it. I checked the wires coming off the detector, connections that the screws make with the detectors wires. I tried changing different settings on the ammeter, but saw no good results. Cameron and I met shortly with Dr. Neumeier about using a leak checker. He is going to show us how to use it tomorrow and hopefully we will finally find and fix our leak within a reasonable amount of time.Tuesday June 30th
We have a light detector inside the large chamber. This detector is movable from the outside. The problem is that the detector is moved around inside the chamber by moving the blue thing back and forth and twisting it, as seen below.Today we set out to find the center of the chamber on the metal bar and in the rotation axis. So we turned on the laser on that is on the optical bench and tried to read the current, but we got no signal. After consulting the manual of the ammeter I tried again, once again no signal. So I went into the large chamber with a multimeter and removed the detector from it's holding. I was able to get a voltage from the detector and it changed when more or less light was place upon it, so the detector works fine. I put it back in its holder and connected the wires back up to it and was not able to get a voltage. I removed the wires and still wasn't able to get a voltage. So this points to the holder of the detector to be our problem. We will investigate this tomorrow.
Monday June 29th
On Friday Dr. Kankelborg gave me the task of trying to find another gas we could us in the HCL. We needed it to be within 440-490Å, but ideally within 450-480Å. We also need it to be easily made in the HCL, can't have high levels of ionization. Finally, we need it to be an noble gas.The list of lines on the NIST website showed a strong line of NeII at 460.7Å. The site cites this article which is sadly missing from the stacks here at MSU. Dr. Kankelborg put in a interlibrary loan request and hopefully we will get our hands on it before the end of summer.
Wednesday June 25th
I set out today to see if the orientation of the valve from the intermediate chamber to the HCL chamber had any affect on the leak. So I place that valve on top of the valve on the scroll pump and the Televac gauge on top of that. I then pumped it down and did the test, flipped it and repeated. I found that there was no evidence for the leak rate depending on the orientation of the valve. I was out of the lab for a hour in the afternoon and I left the pump going, when I returned I did the test once again and as before got much lower numbers for the leak rate. So I flipped the valve again and left it under vacuum for a hour and did the test once again. Here is what I found.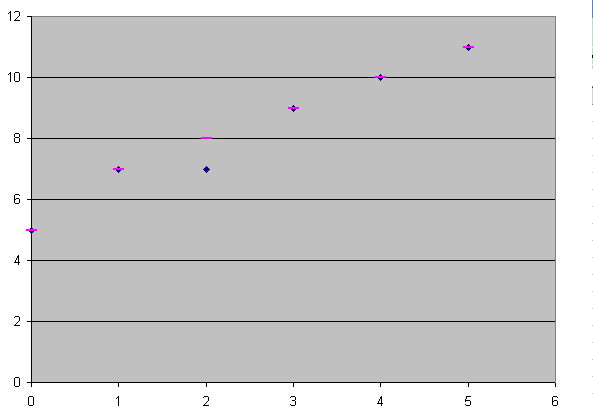
In the end, it doesn't seem like the orientation of the valve has any affect on the leak.
I also noticed something else weird, I was doing the test described above and found that if you very slowly open the valve from closed to open after running the test for a while such that, pressure on the Televac side is around 20mTorr and 5mTorr on the other. there is a point before it opens that the pressure spikes up a few mTorr, it'll do this all the time while you open the valve until it opens slightly and the pressure goes to 5mTorr.
Tuesday June 24th
Today I removed the t-fitting from the system and replaced it with NW-25 and NW-40 parts. Just to see if we have the correct parts to be able to do it. We do have parts to make it work, but just not in the optimal way. I pumped this system down and did the test and found that we still are leaking with around the same rate as before, 10mTorr after 5 mins. I then took the Televac gauge off and placed it right on the scroll pump and pumped it down and closed the valve on the scroll pump and found that it still leaks, but the pressure rises more slowly despite the much smaller volume, but we cannot say with certainty if it is the pipe fittings or the Televac gauge.Monday June 23rd
Today I started by summing up what i have tried to do to find this leak, the only thing that was remaining was to find if it was the Televac gauge or the valve. So I tried moving the TC gauge onto the top of the valve, to see if it leaked with both gauges there. When I did this the leak was much larger then before. When I squirted ethanol on the threads of the gauge the pressure jumped up 200 mTorr. I took it off and put it on again with more care, and still the it leaked and spiked when ethanol was placed on it. Cameron and I think that the pipe fittings may have a large part in our leaks. We are considering putting torrseal on all the pipe fittings and having KF flanges for every connectionFriday June 19th
We aligned the HCL table with the large chamber today. We did this by placing two clear plastic plates inside the chamber with the center of the chamber marked on them. We then placed these at two different locations inside the chamber, one towards the front and one at the back. If the laser going through the HCL pinhole went through both of them in the center our laser would be aligned. When we first turned the laser on we found that we were almost perfectly aligned in the vertical direction, but it was off in the horizontal. So with me inside the clean room observing the movement of the laser, and Cameron moving the table with some taps from a mallet, we were able to get the laser aligned fairly well. We may do some more fine tuning on Monday, but this should do the job.Thursday June 18th
Today Cameron and I wanted to get the laser aligned, so that we could get the HCL chamber itself aligned with the large chamber. We put the pinhole back into the HCL, I had removed it earlier to do leak checks. We also had to put the optics table back on, shown below.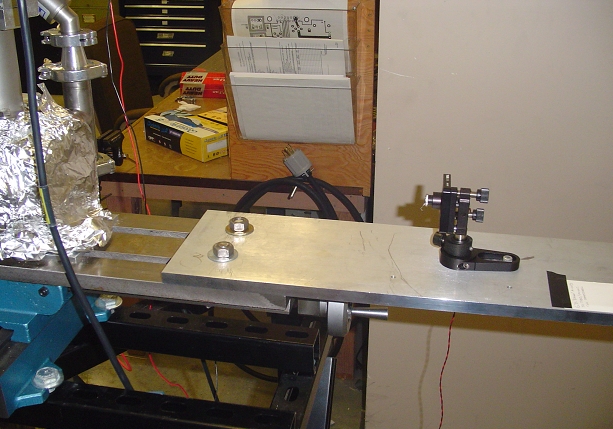
We then pointed the laser at the pinhole and made it as close to normal incidence as we could. We then went into the clean room to see the best way to make sure we have normal incidence. We will further align the laser tomorrow.
Wednesday June 17th
Today I wanted to test several things to check for leaks in them by removing them from the system. I first removed the t-fitting from the top of the HCL and did the test on the hose and t-fittings alone, as seen below.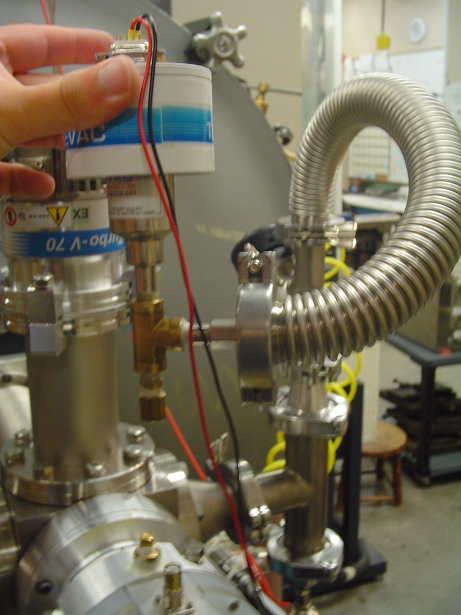
This still showed signs of leaking. So I then removed the hose and just placed the t-fitting above the valve, this also showed signs of leaking. So I then removed the t-fitting and just placed the Televac into the valve, as seen below
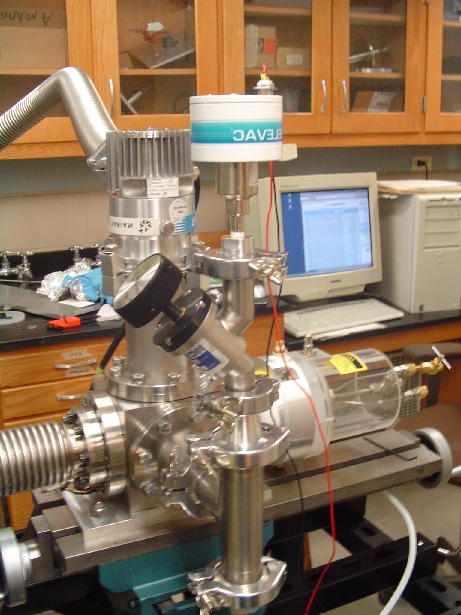
This showed signs of leaking, narrowing it down to one of three things, the valve, the o-ring in the connection or the pressure gauge itself. I changed o-rings and got the same results. I was getting data that looked like this.
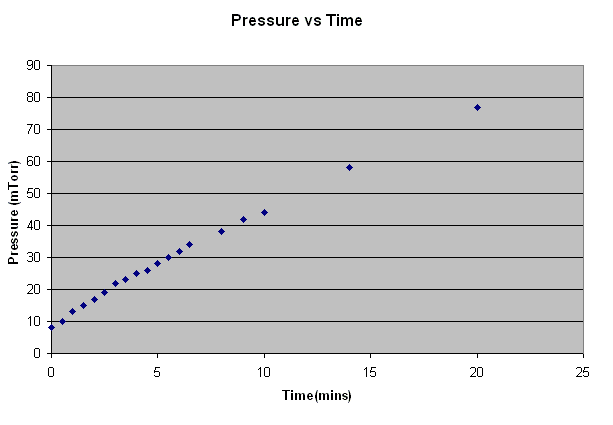
It seems that it must be the gauge or the valve that is leaking, they are the only common factor in all of the tests.
Tuesday June 16th
Today I took apart the HCL again and cleaned all the o-rings. They all looked good except for some small particulates on one of them. I applied some Apiezon to each o-ring in hopes of getting a better seal. I then pumped the system down and gave it about a hour at vacuum so I could get the best results, as graph from June 12th suggests that this might help. I then did the test. Below is the data with yesterdays results for comparison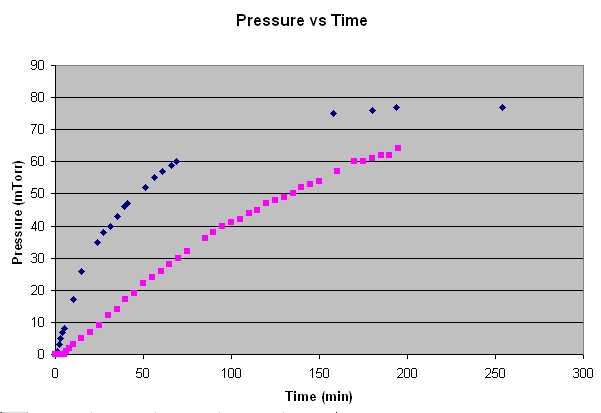
It seems that we didn't fix the problem, we just made it take longer to get to the final value. Tomorrow I'm going to isolate the t-fitting and hose and test for leaks in just that part of the system to try and hunt this leak down.
Monday June 15th
After our lecture this morning, I set out to see what pressure the chamber goes to while running the test. I found that it got to 77mTorr in two hours and stayed at 77mTorr for a hour. Tomorrow I'm going to take the HCL apart again and take a more careful look at the O-rings in the system.
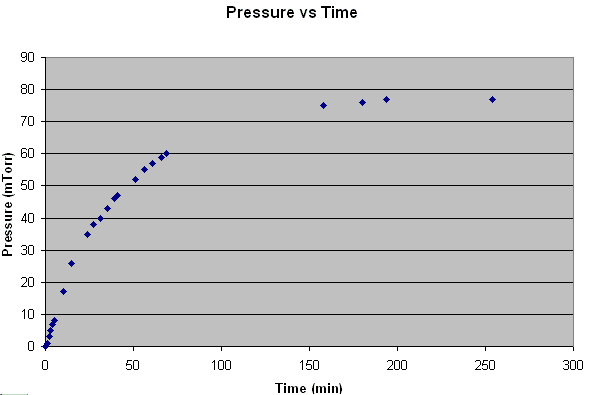
Friday June 12th
I took some pictures finally, So now you'll be able to see what I'm talking about.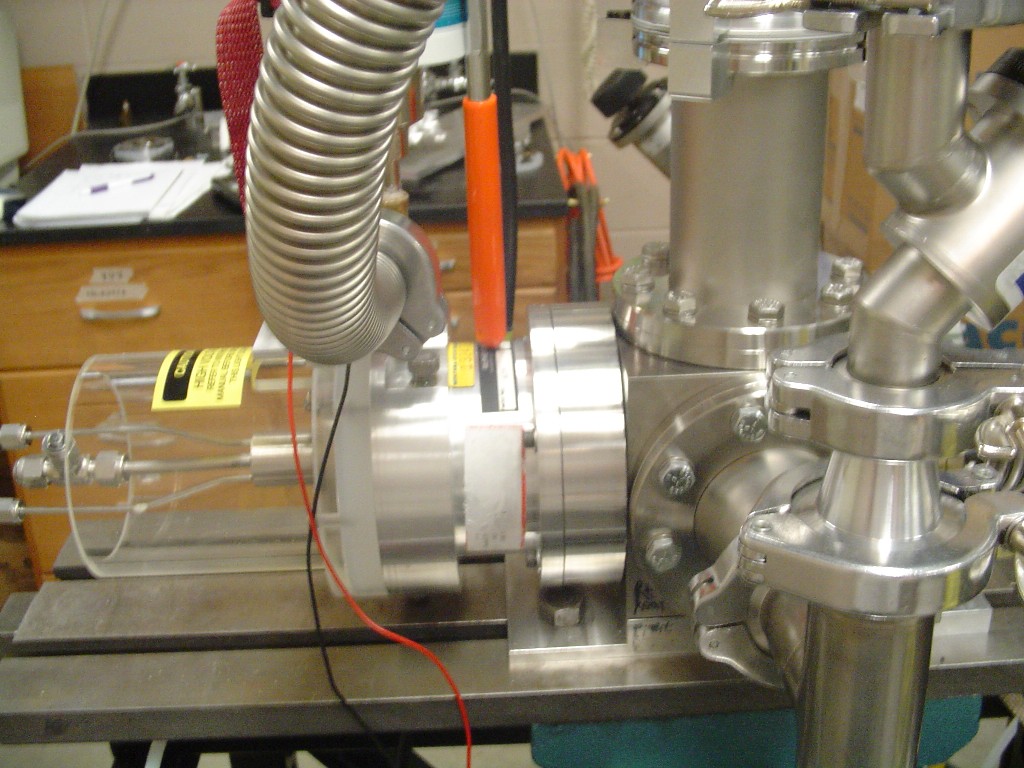
There is two different views of the HCL. Working out way left to right on the 2nd picture, we first the large (100sq ft) vacuum chamber and it connection to the intermediate chamber. The intermediate chamber is the cubical part in the middle. On top of this sits the turbo molecular pump and the hose coming out of that connects to our scroll pump. connected to the right of the intermediate chamber is the HCL chamber, these are connected by a 50 micron pinhole. The test we have been doing to check for leaks has been to close the hose connecting the intermediate chamber to the HCL chamber and watch the pressure rise over time. You can see the cloudy plastic, not the clear, on the end of the HCL. This is the plastic plate we have had problems with. You can also see the T-fitting on top of the HCL that we suspect might be attributing to our leak.
Today I started the day out by pumping it down and running the test to see if the silicone sealant I put on the outside of the T-fittings (see picture below)had any affect. You can see the silicon sealant on the top of the t-fitting.
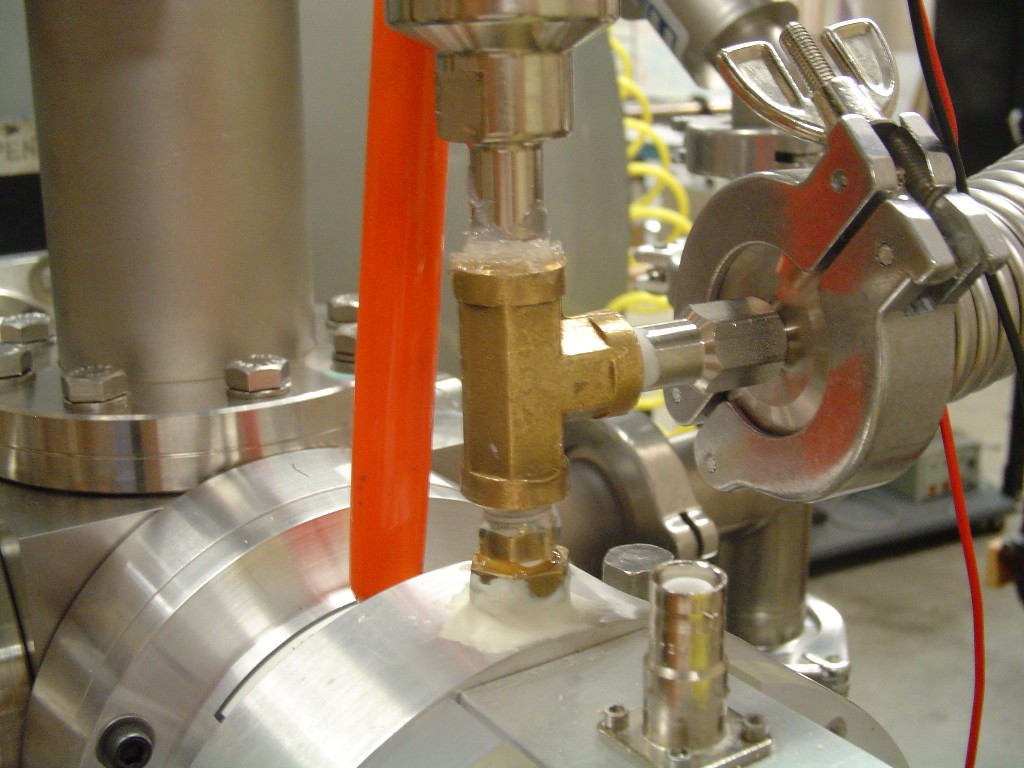
Here is the data.
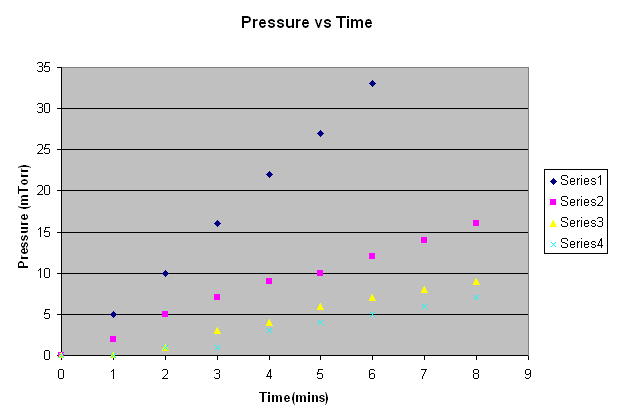
Series 1 was taken right away when I got there
Series 2 was taken after I put ethanol on the bottom joint of the t-fitting
Series 3 was ethanol on the top joint
series 4 was taken without ethanol and was taken last.
After doing series 1-3 I was thinking that the ethanol is slowing the leak down and that it looks like this was a good way to find the leaks, but then when I took the last series I started thinking that the amount of time the system was under vacuum has an affect on the leak size. So after lunch I did two things. I put some Apiezon grease on the lower joint of the t-fitting. You can see the orange stuff on the image above if you look. Then I pumped the system down and did the test again. Then I waited 20 minutes and did it again and so on. Here is what I found
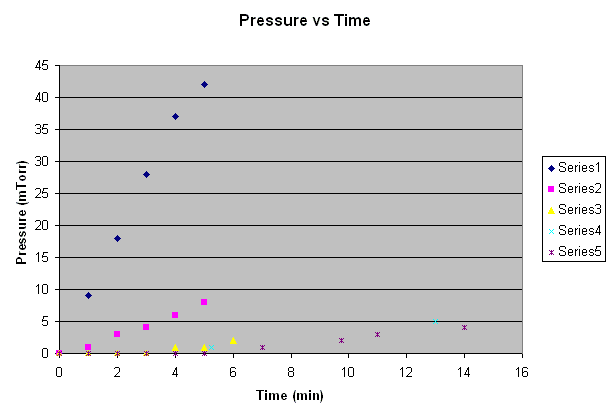
It seems that our leak gets better over time. I am not sure what is the cause of this.
I also put some Apiezon onto the top joint in the t-fitting, I will test this first thing on Monday.
Tuesday June 9th - Thursday June 11
Same old story, we went leak hunting. We drilled new holes in the plastic plate, so we are able to screw it in again. We pumped it down and found out that our leak had grown an order of magnitude. So we put Torr seal on some of the fittings in the T-fitting that connects the pressure gauge and the hose from the intermediate chamber to the HCL chamber. This got us within a factor of two of our original leak. I then put ethanol on the fitting and see if that had an affect, it lowered the leak to a half of the original values.Monday June 8th
We once again set off to find our leak. We started by capping off the He line and did the same experiment as before, getting the pressure as a function of time. We saw a slight improvement from this. We then took apart the HCL to clean and examine it. We saw that the helicoils on a plastic plate in the HCL were damaged, so we tried to fix it. It seems that the threads in the plastic plate got stripped, ending our work for the day. We are going to try and figure out a way to fix it or just remake the plastic plate.Friday June 5th
Today we removed and clean everything to the left of the pinhole.After we cleaned everything up and replace a few O-rings, we tried again to pump the system down to see if we had a leak still. We did this by pumping down the system and closing the valve that connects the intermediate chamber to the HCL chamber and measured the pressure in the HCL chamber as a function of time, this method is from here called the test.
We got the above data. It is clear there is a leak somewhere. We are unsure of why the first run the leak seems to be so much higher then the other runs. On Monday we will continue to try and find the leak.
Thursday June 4th
I worked on my IDL project for most of the day today. My project was to find several things out about an image of a spot.
I had to find the number of counts, the centroid and the RMS radius (how fuzzy it is) of the spot. I got it all to work out within a couple of hours after relearning some of my linear algebra.
We had a MOSES meeting today where Dr. Kankelborg mainly went over the basics of what EUV light is and how MOSES works.